You can connect an AI agent to a third-party website through a browser execution layer. The agent reads the current page, chooses an action, sends that action to the browser, checks the result, and repeats. The target site does not need to expose an API or add code for your agent when the execution layer works through the site's existing interface.
This guide covers the build: what the execution layer has to handle, how to wire an agent to a live session over MCP, how to write the action policy that keeps it inside its lane, and what to test before it touches real users.
TL;DR
The model is not the hard part. The execution layer is. An agent on a site you do not own needs current page evidence, a restricted action set, a check after every change, and a route back to the user.
Decide where the browser runs first. An isolated browser suits scraping, testing and scheduled work. A live session suits support, onboarding and voice assistance, where the person is already on the page.
With Webfuse the build path is short: create a Space, enable the Automation app, protect the Space key, connect an MCP client, bind it to a Session.
Write the action policy before the prompt. What the agent may read, what it may change, and where it must stop.
Stop before commitment. Prepare the task, show a review screen, leave submission and payment to the user.
What "a website I don't control" means in practice
Ownership changes what you can ask the target site to do. On your own product, your team can add an SDK, publish an API, expose WebMCP tools, add stable element identifiers, or change the interface when automation fails. A third-party site gives you none of those guarantees.
Your agent still needs a dependable way to observe and act. The site may use a single-page framework, delayed content, embedded frames, custom controls, changing class names, or a login flow that resists a fresh browser.
A workable setup handles four jobs. Each one affects reliability, response time, and how much access the agent gets.
- Read the active page state. The model needs useful information about headings, fields, buttons, links, dialogs, validation messages, and loading state.
- Take browser actions. It needs tools for opening URLs, clicking, typing, selecting options, scrolling, and capturing a visual check.
- Keep session context. Most useful tasks happen after login and span more than one page.
- Return control to a person. The user needs a clear way to review, correct, approve, or finish the task.
The model does not solve these browser problems. It can decide that a form needs a postal code, but an execution layer still has to locate the field, enter the value, detect an error, and report the new state.
A script injected straight into the page is the setup that looks easiest and breaks first. Class names move, components render late, overlays cover controls, cross-origin frames close off, and framework state does not always react to a synthetic event the way it reacts to real input. Our write-up on reliability challenges for agents on live websites goes through those failure modes in detail. Treat selectors as observations rather than contracts: prefer semantic labels and accessibility information, wait for the page to settle, and check the outcome after every action that can change the interface.
Where the browser runs
Two decisions shape everything downstream: where the browser runs, and whose session it uses. Those settle authentication, visibility, latency and deployment work before you write a line of code.
A headless browser opens a separate instance. A browser extension connects the agent to a person's local browser. WebMCP depends on tools published by the target site. A live-session system such as Webfuse connects the agent to the browser session the person is already using. We compare all of them in How to Connect an AI Agent to the Live Web, and the MCP servers that implement them in 6 Best MCP Servers for Browser Automation.
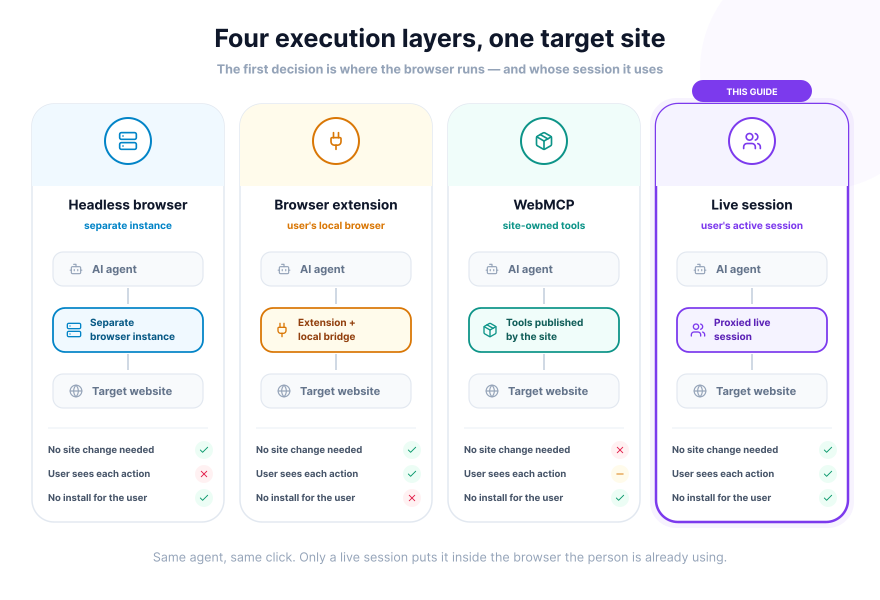
The rest of this guide builds on live-session actuation, because that is the model that fits user-facing work on a site you do not own: no code on the target site, no extension for the user to install, and the person can watch and take over. Webfuse's Session MCP documentation covers the tool surface, an MCP-compatible agent can open URLs, read pages, fill forms, click, select text and capture screenshots without changing the underlying site.
How the Webfuse connection works
A Webfuse Space holds the configuration for one class of sessions. It controls installed apps, access settings, and the browser tools available to an agent. Each live Session runs from that configuration, so one Space supports many separate user sessions.
Inside a Session, the Automation app exposes browser actions. The Session MCP endpoint makes those actions available to an MCP client, giving the model a standard tool interface instead of a custom integration per page. Space creation, Session launch, Automation app setup and MCP connection are documented in the Webfuse getting-started guide.
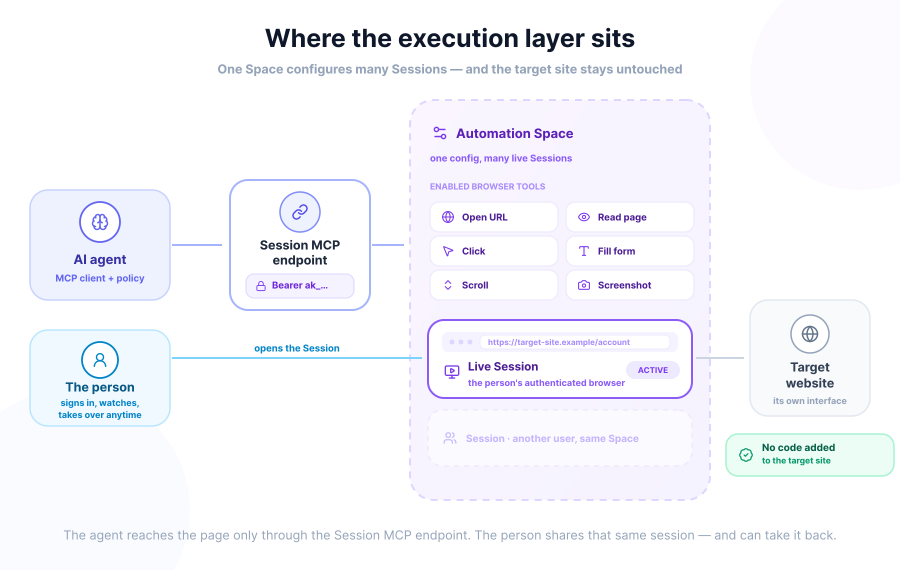
The action cycle runs like this:
- The user opens a Webfuse Session.
- The agent connects to the Session through MCP.
- The agent requests the current page state.
- The model chooses one browser action.
- Webfuse applies the action in the live page.
- The agent reads the changed state and checks the result.
- The agent continues, asks for help, or hands control back.
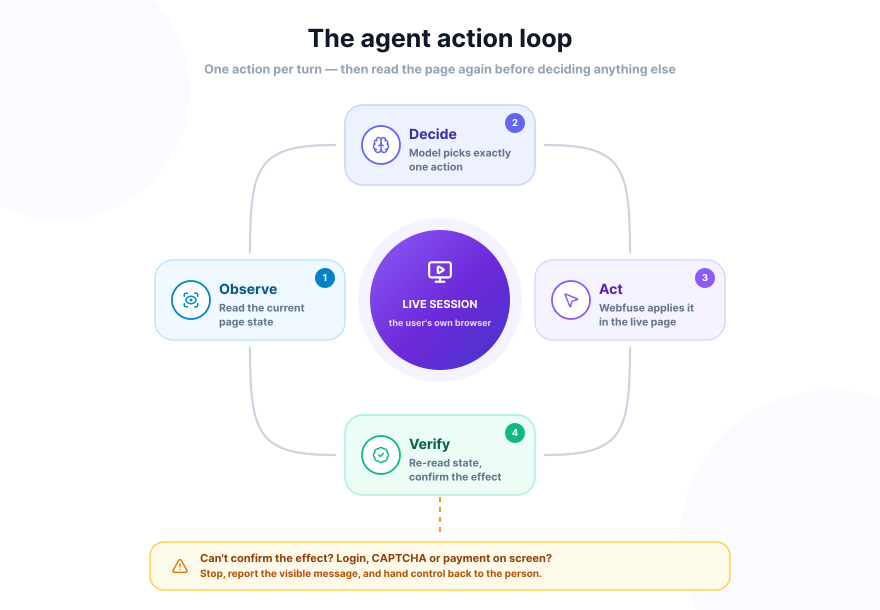
That loop matters more than a long prompt. An agent that fires three clicks off one stale page snapshot will miss the dialog, validation error or route change that the first click produced. Reading state again after each material action gives the model current evidence.
A practical build sequence
Start with one narrow task on one known site. "Help with any task on any website" creates too many unknowns for a first test. "Find an appointment, fill the non-sensitive fields, then stop before booking" gives you a clear path and a measurable result.
Keep the first workflow short enough to inspect step by step. Once it holds up across normal and error cases, extend the scope.
1. Define the task boundary
Write down what the agent may read, what it may change, and where it must stop. This boundary becomes the basis for tool access, prompts, tests and human approval.
Keep each answer concrete enough that a tester can mark it pass or fail.
- Which domains and paths may the session open?
- Which fields may the agent read or edit?
- Which actions need user approval?
- Can the agent submit a form, or must it stop on the review screen?
- What happens after a login prompt, CAPTCHA, access denial, or changed layout?
- How does the user take control?
A shopping assistant might search products and add selected items to a basket, then stop before payment. An HR assistant might read a leave calendar but have no access to salary, banking or medical pages.
2. Create a Space and enable browser tools
Create an Automation Space in Webfuse Studio, open a Session, and enable the Automation app. The configuration can expose all browser tools or a reduced set. A read-only helper may need page inspection and screenshots but no typing or clicking.
For an agent that takes actions, grant only the tools the task requires. Tool access is changed in the Automation app settings and applies across Sessions in that Space.
3. Create and protect the automation key
Generate a Space Automation API key in the Space settings. The key grants remote control over Sessions linked to that Space, so store it in a secret manager and keep it out of client-side code, URLs, prompts and logs.
Webfuse marks this key with the ak_ prefix and uses it as a bearer token for the Session MCP endpoint. It is full remote-control access, which makes key scope and storage part of the security design rather than a setup detail.
4. Connect the MCP client
An MCP-compatible host connects to the Session endpoint over HTTP. Replace the hostname and secret placeholders with values from your Space, and keep the secret in an environment-backed input rather than a checked-in file.
{
  "servers": {
    "webfuse-session": {
      "type": "http",
      "url": "https://session-mcp.HOSTNAME/mcp",
      "headers": {
        "Authorization": "Bearer ${input:automation_key}"
      }
    }
  }
}
The agent needs a Session ID for each browser it controls. Webfuse supports a standard mode, where every tool call carries a session_id, and a dynamic mode, where the MCP connection binds to a Session before loading the full tool set.
5. Give the agent an action policy
Tool access defines what the agent can technically do. The action policy defines what it may do in the workflow, and when it has to ask. Keep the policy shorter than the website instructions: browser state changes, the policy should not.
Goal: Find the requested service and prepare the form for review.

Allowed:
- Open pages within the approved domain.
- Read labels, availability, and validation messages.
- Fill non-sensitive fields supplied by the user.

Ask before:
- Accepting terms.
- Uploading a file.
- Sending personal data not already visible in the Session.

Stop before:
- Final submission.
- Payment.
- Account or password changes.

If blocked:
- Report the visible message.
- Ask the user to take control.
- Do not retry the same action more than once without new page evidence.
Back the policy with technical restrictions: reduced tool access, domain controls, data masking, approval gates and session logs.
6. Verify each material action
After typing, read the field value or nearby confirmation. After clicking, check the new heading, URL, dialog or status message. After adding an item, check the basket count and item details.
This observe-act-check pattern catches wrong targets early, before one incorrect click turns into a chain of later mistakes.
Logged-in sessions and user credentials
Most useful workflows start after authentication. A headless browser needs its own login flow or a transferred browser profile, which is extra work and more exposure of session material.
A live session takes another route. The user signs in through the session, then the agent acts in that same context. The model works on the resulting interface without ever seeing the raw password.
That is not the same as the agent having no access to sensitive data. Once logged in, pages can expose names, addresses, account records, tokens in URLs and private messages. Limit page scope, mask sensitive elements before model access where the platform supports it, and do not log full snapshots without a reason.
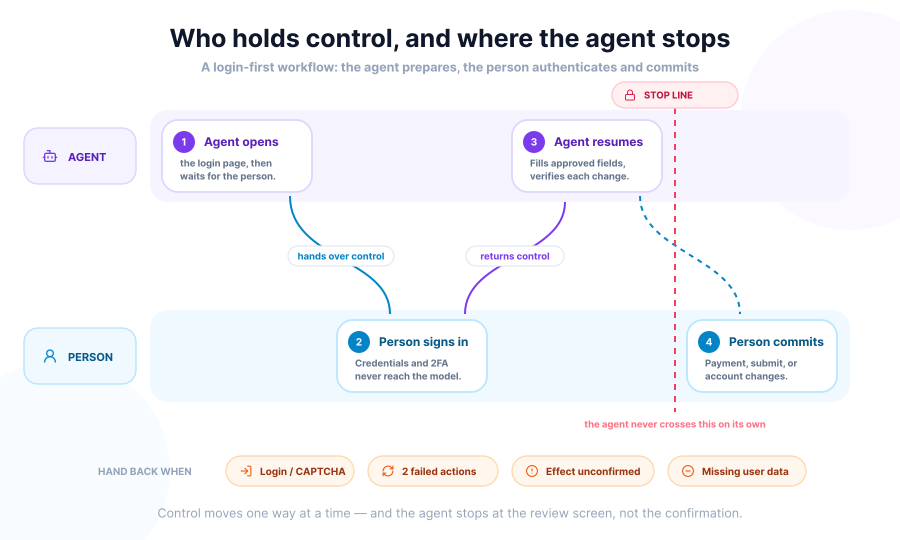
For login and other high-risk steps, this pattern is easy to test and keeps account ownership with the user:
- The agent opens the login page.
- The user takes control and authenticates.
- The user returns control once the account page loads.
- The agent completes the approved low-risk steps.
- The agent stops at the final review or transaction screen.
It fits forms, support portals, benefit systems and e-commerce tasks where a person needs help but should keep control over authentication and final commitment.
Human handoff is part of the design
An agent working on a live site will meet cases its prompt did not cover. The page changes, a product is unavailable, a policy choice needs judgment, or the user wants a different option.
In a user-visible Session the person sees the same page and takes over. Define the handoff triggers before testing, because an agent should not keep guessing once it has lost reliable evidence:
- The page asks for information the user did not supply.
- A login, CAPTCHA, consent step, payment or legal acceptance appears.
- Two actions fail against the same page state.
- The available options differ materially from the request.
- The agent cannot confirm the effect of its last action.
- The site shows a warning, lockout notice or access error.
A good handoff message states what the agent attempted, what changed, and what the user needs to do next. "I'm stuck" is worth less than "The site requires a one-time code sent to your phone. Please take control, enter it, and return the session to me on the account page."
For the approval side of this, see Human Approval Checkpoints for AI Agents.
When this is the wrong approach
A live Session adds nothing when no person needs to watch, guide or take over. For nightly extraction, load testing, screenshot generation and deterministic checks, a headless browser is simpler.
Some sites expose direct APIs or WebMCP tools for the exact task. Structured functions give clearer inputs, outputs and error handling than UI interaction, so use them when the site offers them and the workflow does not need visible browser action.
And check the target site's terms, access rules and your own data obligations before deployment. Technical access is not permission.
Testing an agent on a third-party site
A working happy path proves very little. Readiness depends on how the workflow behaves after delays, layout changes, unavailable options, expired sessions and incomplete user data.
Build a small test set before broadening the task. For each case, record the expected stop point and the evidence that marks success.
| Test | Expected behaviour | Evidence |
|---|---|---|
| Normal path | Completes approved steps and stops for review | Correct page, fields, and summary |
| Slow content | Waits, rereads, then acts | No click before target loads |
| Changed label | Uses page meaning instead of a fixed class name | Correct control selected |
| Missing user data | Requests the missing value | No guessed personal data |
| Login expires | Hands control to the user | No repeated login attempts |
| CAPTCHA appears | Stops for human input | Clear handoff message |
| Product or option unavailable | Offers visible alternatives or asks | No silent substitution |
| Final transaction | Stops before commitment | No order, booking, or submission |
| Wrong action | Detects the mismatch and recovers or stops | State check shows correction |
| Session ends | Reports loss of access cleanly | No claim of task completion |
Measure more than task completion. Track action count, retries, handoffs, time to recovery, incorrect clicks, user corrections and unverified outcomes. Those numbers expose the weak steps that a single success rate hides.
Choosing the architecture
Building an agent for a website you do not own is an execution problem. The model needs current page evidence, a restricted action set, a check after each change, and a route back to the user.
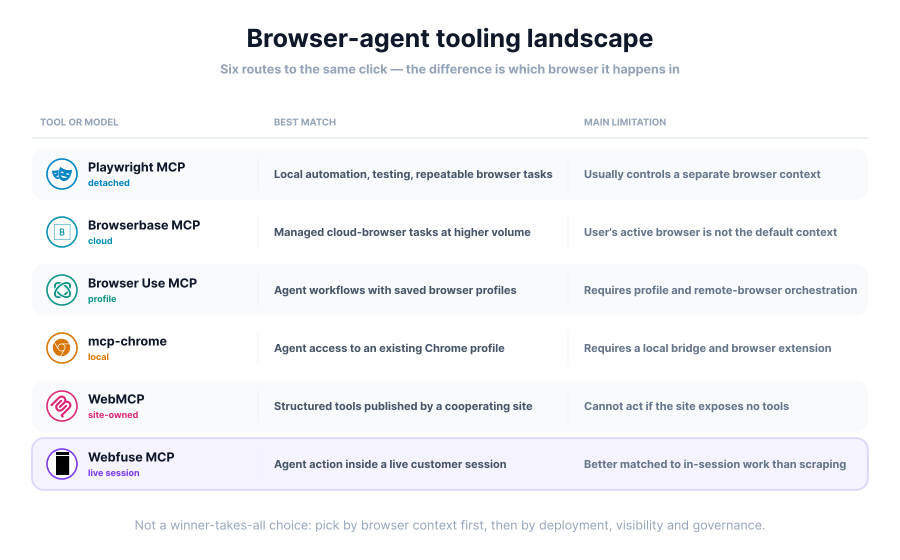
Use an isolated browser for background work. Use site-published tools when the owner offers them. Use an extension when personal desktop automation and installation are acceptable. Use live-session actuation when the agent needs to work inside the user's visible, authenticated browser context.
With Webfuse the path is short: create a Space, enable Automation, protect the Space key, connect the MCP client, bind it to a Session, then add narrow action and handoff policies. Start with one workflow, stop before high-risk actions, and widen the scope only once the failure cases behave.
Frequently Asked Questions

Next Steps
Connect an agent to any web app
No signup, runs in your browser
Ready to let your AI agent act on the live web?
Headless browsers give your agent a copy of the web. Webfuse gives it the session your user is actually in — over MCP, with no install.
- No credit card
- Free forever plan
- Quick setup
Related Articles