How it works
- Customer Says hello in the Cognigy chat. The agent replies and sends a link.
- xApp The link opens a Webfuse session with the website, right next to the chat.
- Session The session tells Cognigy its ID. Cognigy now knows which browser to drive.
- AI Agent Uses the Webfuse tools over MCP to navigate, read, click and type in that session.
What you need, and how long it takes
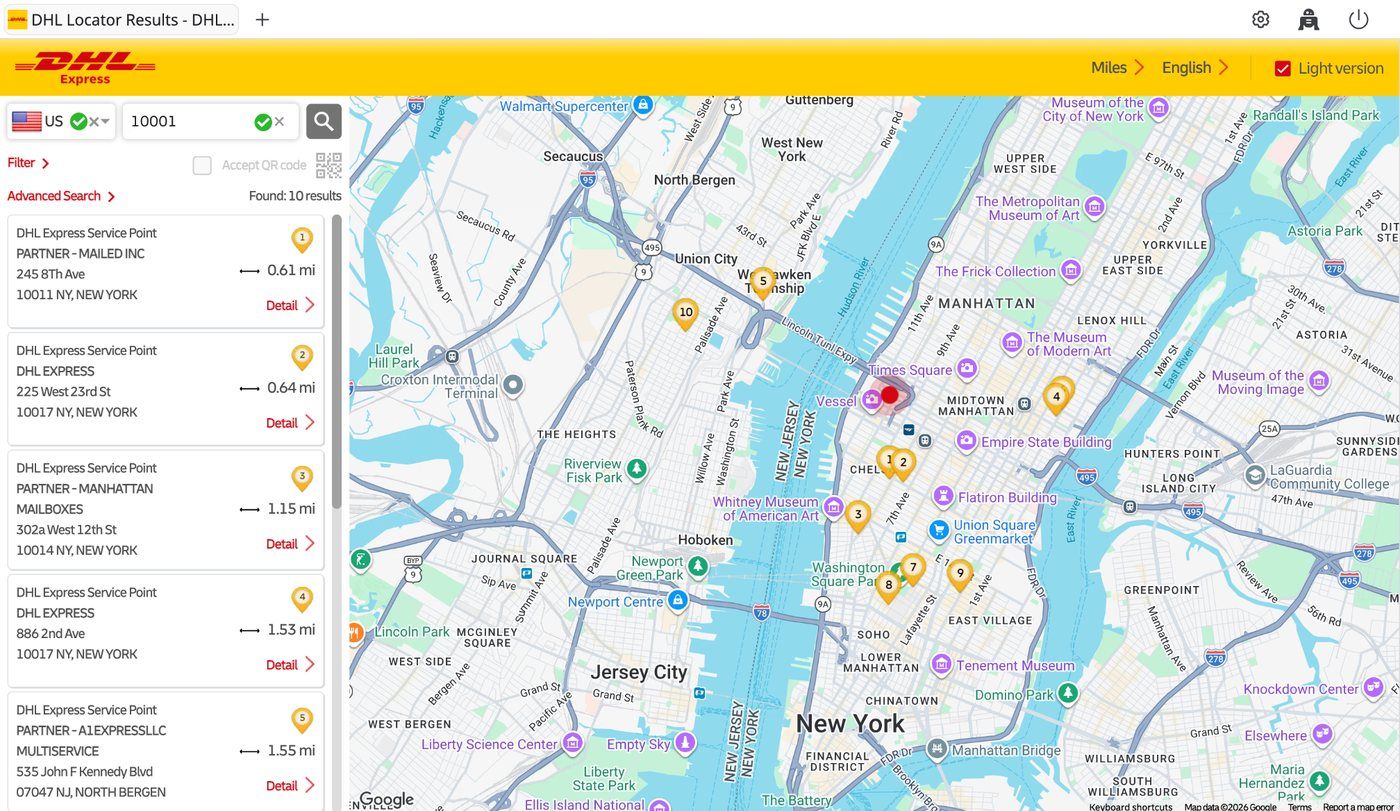
A Webfuse Studio account, a Cognigy project with AI Agents and xApps, and a website to work on. We use DHL's service point locator here. Plan on about 30 minutes for the first one, from sign-up to a working demo. Pointing the same flow at a second website is mostly step 1 and a few prompt lines.
Step 01/ 07 4 min
Sign up and create an Automation Space
- Sign up or log in at webfuse.com/studio. Open Get started with Automation and click Create an automation space manually at the bottom.
- Name the Space and click Start session.
- In the session, click the settings icon, open Start Page, choose Open a specific page or set of pages, add the website's URL and click Save Changes. Then close the session tab.
Step 02/ 07 2 min
Copy the keys and Space ID
- Open the Space in Studio and go to Developers.
- Copy the Automation key (starts with
ak_). - Click New API key, keep Widget API key selected, create it and copy it (starts with
wk_). - Note the Space ID, the number under the Space name.
| Value | Looks like | Goes into |
|---|---|---|
| MCP server URL | https://session-mcp.webfuse.com/mcp | Step 4, MCP Tool node |
| Automation key | ak_… | Step 4, Authorization header |
| Widget API key | wk_… | Step 6, xApp HTML |
| Space ID | 4-digit number | Step 6, xApp HTML |
Step 03/ 07 3 min
Create the AI Agent in Cognigy
- Go to Build › Agent and click New AI Agent. Give it a name and a one-line description.
- Under Speaking Style, move the first slider all the way to Concise.
- Under Instructions, replace the second default line as shown below.
- Under Job Selection, choose Personality Only and click Create.
We found that the default second line makes the agent ask a question after every answer, even when the customer already said what they need. So we recommend replacing it, so the agent acts, reports and stops.
- Only introduce yourself at the beginning of a conversation or when asked.
- Ask a single follow-up question to keep the conversation going.
- Only introduce yourself at the beginning of a conversation or when asked.
- Do not ask follow-up questions. After completing a request, state the result and stop.
- Ask a question only when you cannot continue without the answer.
Step 04/ 07 6 min
Add the prompt and connect Webfuse over MCP
- Go to Build › Flows, create a flow, and add an AI Agent node under Start. Select your new agent, give the job a name and a one-line description, and paste the prompt below into Instructions and Context.
- In the same node, open Advanced › LLM and pick a model that is good at tool calling. We used Claude Sonnet 4.
- Click the + to the right of the AI Agent node and add an MCP Tool. Name it, set the server URL to
https://session-mcp.webfuse.com/mcpand drag Timeout to 30. - Under Advanced in the MCP Tool node, set Condition to
{{context.webfuseId}}and add a custom header: keyAuthorization, valueBearerfollowed by yourak_key. Save. - Cognigy adds a Call MCP Tool node for you. Leave its defaults: Resolve Immediately on, Store in Input,
aiAgent.toolResult.
# Environment
You are helping a customer find a DHL drop-off point through a conversation. The customer is watching a live browser session that you control. They cannot click anything themselves and rely on you to act for them. You act with the Webfuse tools: navigate, act_click, act_type, act_keyPress, act_scroll and see_domSnapshot. The result of your last tool call is in context.aiAgent.toolResult.
# Session
The current session ID is available in context.webfuseId: {{context.webfuseId}}
Pass it as session_id on every tool call.
# How to work
1. Act, don't ask. Use the details the customer gave you straight away. Ask a question only when you cannot continue without the answer, such as a ZIP code.
2. When the customer asks you to do something on the page, your first response must be a tool call. Do not write any text while you are still using tools. Write one message only, when you have the answer or need one. Never mention wf-ids, snapshots or tools to the customer.
3. Use as few tool calls as you can. You can make at most 4 per customer message.
4. To read the page, call see_domSnapshot with options {"webfuseIDs": true, "quality": 0.1, "maxTokens": 16000}. Target elements with the wf-id values the snapshot returns. If the element you need has no wf-id, target it with a CSS selector built from what the snapshot shows, such as its class.
5. If you already have a snapshot of the current page from earlier in the conversation, act on it directly instead of taking a new one.
6. If a cookie banner is in the way, click "Strictly Necessary Only".
7. Never take the same snapshot twice in a row without acting in between. Do not use see_guiSnapshot.
# The DHL service point locator
- To search near a place, call navigate with https://locator.dhl.com/results?countryCode=US&address=ZIP&language=en, putting the customer's ZIP code or address in place of ZIP. Then read the results.
- Each result shows the location name, address and distance.
- For opening hours and services of one location, click the "Detail" text inside that location's result, then read the page.
# Answering
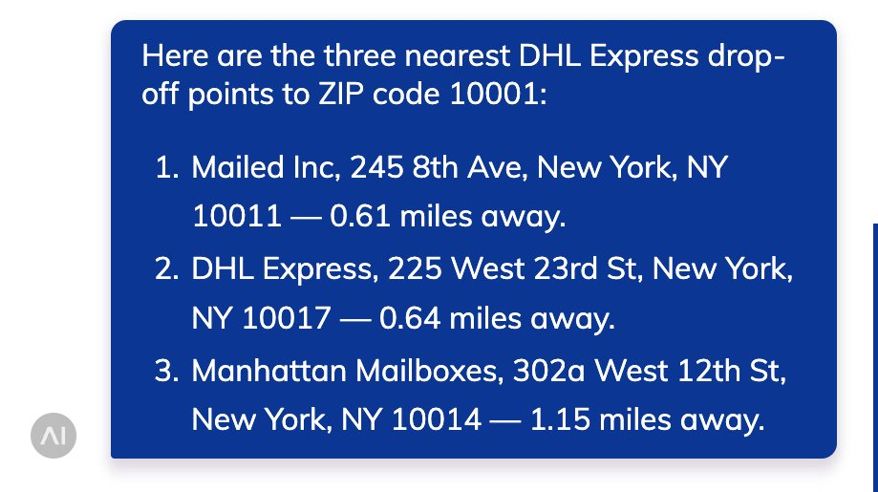
For a search, name the three nearest locations with street address and distance, one sentence each. For a question about one location, answer exactly what was asked, such as its Saturday hours. Then stop. Do not offer further help and do not end with a question. Plain text only, no markdown.
Step 05/ 07 3 min
Add a REST endpoint
The xApp uses this endpoint to send the session ID back into the conversation.
- Go to Deploy › Endpoints, click New Endpoint, choose REST, select your flow and save.
- Set NLU Connector to No NLU and make sure the endpoint is enabled.
- Open Transformer Functions, turn on Enable Input Transformer, replace the code with the transformer below and save.
- Copy the Endpoint URL. You need it in step 6.
createRestTransformer({
    handleInput: async ({ endpoint, request, response }) => {
        const { userId, sessionId, text, data } = request.body;
        // data can arrive as a string
        const parsedData = typeof data === 'string' ? JSON.parse(data) : data;
        return { userId, sessionId, text, data: parsedData };
    },
    handleOutput: async ({ output }) => {
        return output;
    },
    handleExecutionFinished: async ({ processedOutput }) => {
        return processedOutput;
    }
});
Step 06/ 07 7 min
Add the xApp that shows the session
An xApp is a page Cognigy shows next to the chat. Ours starts the Webfuse session, shows it to the customer, and posts the session ID to your endpoint. Build this branch under the AI Agent's Default exit:
| Node | Setting |
|---|---|
| If | {{input.text}} = __ACTIVATE_WEBFUSE_SESSION__ |
| Then: Add To Context | Key webfuseId, value {{input.data.webfuseId}}, mode Simple |
| Else: If | xApp Session URL token, not contains, cognigy |
| Then: xApp: Init Session | Defaults |
| Next: Say | Text: Open your live browser session here: plus the xApp Session URL token |
| Next: xApp: Show HTML | Content HTML Body only, paste the code below |
In the code, replace the three marked values: your endpoint URL from step 5, your wk_ widget key and your Space ID.
<script src="/sdk/app-page-sdk.js"></script>
<style>
  html, body { margin: 0; padding: 0; width: 100%; height: 100%; overflow: hidden; }
  #session-container { position: absolute; inset: 0; width: 100%; height: 100%; border: 0; }
</style>
<!-- Must be an iframe -->
<iframe id="session-container"></iframe>
<script>
  const COGNIGY_USER_ID = "{{input.userId}}";
  const COGNIGY_SESSION_ID = "{{input.sessionId}}";
  const COGNIGY_ENDPOINT = "PASTE_YOUR_ENDPOINT_URL_HERE";
  (function (w, e, b, f, u, s) {
    w[f] = w[f] || { initSpace: function () { return new Promise(r => { w[f].q = arguments; w[f].resolve = r; }); } };
    u = e.createElement(b); s = e.getElementsByTagName(b)[0];
    u.async = 1; u.src = 'https://webfuse.com/surfly.js';
    s.parentNode.insertBefore(u, s);
  })(window, document, 'script', 'webfuse');
  webfuse.initSpace('PASTE_YOUR_wk_WIDGET_KEY_HERE', 'YOUR_SPACE_ID', {})
    .then(async space => {
      const session = space.session();
      session.on('session_started', async (session) => {
        const info = await session.getSessionInfo();
        const response = await fetch(COGNIGY_ENDPOINT, {
          method: 'POST',
          headers: { 'Content-Type': 'application/json' },
          body: JSON.stringify({
            userId: COGNIGY_USER_ID,
            sessionId: COGNIGY_SESSION_ID,
            text: '__ACTIVATE_WEBFUSE_SESSION__',
            data: { webfuseId: info.sessionId }
          })
        });
        console.log('Cognigy response status:', response.status);
      });
      await session.start('#session-container');
    })
    .catch(error => console.error('Failed to start Webfuse session:', error));
</script>
Step 07/ 07 10 min
Test it
- Open Chat with your Agent (top right) and say hello. The agent replies and sends the session link.
- Open the link once, in a tab you keep in front. The website loads in the session.
- Give a ZIP code and ask: 10001. Where's the nearest place I can drop off a DHL Express package? The agent searches the locator and names the three nearest drop-off points.
- Then ask: Which of those are run by DHL itself, not a partner?
Debugging tips
When the agent does something unexpected, these are the checks that helped us most, roughly in the order we would try them.
| What you see | Try this |
|---|---|
| You are not sure what the agent did | Read the AI Agent: Tool Call entries in the test chat. Check that session_id is filled in and the arguments look right. An empty session_id means the xApp never reported back: check the endpoint URL in the xApp code and that the input transformer is on. |
| The agent never uses the Webfuse tools | Check the MCP Tool Condition is {{context.webfuseId}} and the session link was opened. |
| The agent clicks the wrong thing, or says it cannot find a button you can see | Some sites make plain text clickable, like DHL's Detail link. Find it in a see_domSnapshot in the Inspector. If it has no wf-id, keep the full snapshot in the prompt (not interactiveOnly), so the agent can still target it. |
| The agent says the page is empty or still loading | Large pages can be cut off, and some results load a moment later. Raise maxTokens in the prompt, and where the site allows it, send the agent straight to a results URL instead of filling a form. |
| "Infinite Loop Detected" | Cognigy allows about four tool calls per customer message. Give the agent the shortest path in the prompt, such as a search URL. Journeys that need more steps are a job for a custom tool (see below). |
| The agent asks follow-up questions | Replace the default instruction from step 3. |
| The agent says "I am searching" but nothing moves | Switch the AI Agent node's LLM to a stronger tool-calling model. |
| The session area stays empty | The container in the xApp code must be an <iframe id="session-container">. Check the widget key and Space ID. |
| "You are not allowed to join this session" | The link was opened twice. Reset the chat and say hello again to get a new one. |
Where you are now
You just built what used to take an expert human agent
Until now, a customer stuck on a website needed a person who knows that site, works from a handbook and walks them through it. Your Cognigy agent now does almost the same job. It opens the right page, reads it, clicks and types for the customer, right inside their conversation. It needed no handbook, no API from the site owner and no integration project.
To be honest about where that leaves you: today your agent works like a skilled person on their first day at the job. It reads every page, works out the next step and checks the result, every single time. That is why it works on any website. It is also why it takes a little while per request and reads a lot of page along the way.
- Human navigation A person, a handbook and years of knowing where everything is.
- Agentic discovery You are here Your agent reads the live page and works out each step, like an expert would. Works on any website from day one, at the pace of someone finding their way.
- Custom tools The routines your customers need every day become one call each. Much faster, with far fewer tokens.
- Website as an API Those routines become endpoints any of your systems can call.
Your next step: make it fast with custom tools
Most customers ask for the same few things. At Level 1 the agent rediscovers the way to each of them on every request. A custom tool remembers the way. It wraps one routine, such as look up an order or fill the claim form: the agent calls it once with the inputs, and the tool does the clicks and checks inside the session and returns just the answer.
On DHL, a shipping quote takes about fifteen steps on the site, more than Cognigy allows in one turn. As a custom tool, getShippingQuote is a single call. Reading one location's opening hours works the same way.
- Much faster. One call instead of a read, decide and click loop. The customer gets the answer sooner, and journeys too long for Cognigy's limit of about four tool calls per message now fit in one.
- Far fewer tokens. The agent no longer reads whole pages to find its way, so every conversation costs less.
- Nothing to change in Cognigy. Custom tools appear in the same MCP Tool node, next to the built-in ones.
- Level 1 stays underneath. If a website changes, the agent reads the new page and still gets the job done.
How to make them. Record the steps in the Automation Inspector's Playback tab and save them as a tool, with no code. Or ask your coding agent (Claude Code, for example) to build a small Space Extension that registers them: describe the routine, point it at the custom tools docs, and let it build and test them for you.